Assign Standards
Cabinet Solutions creates each cabinet with a file of information called a standards file. This file is stored with each cabinet and gives that cabinet the instructions it needs to be constructed the way you want it to be. If every cabinet within a job has the same standards file saved with it, they will all be built the same way. However, there may be times when you want individual cabinets or rooms of cabinets to differ from the rest of the job. The "Assign Standards" button is a tool that allows you to pick one or more cabinets in a room so you can "Assign" those cabinets a different standards file.
Note: Once you have changed a cabinets individual Cabinet Standards any changes to your Job Standards will not affect that one cabinet. Resetting a cabinet to your Job Standards is possible and will be explained in this chapter.
To Assign Standards to one or more cabinets within this room:
- In the Place Cabinets Screen, click on the Assign Standards button in the Tool Box to the right of the screen. You will notice a new Tool Box appear. You are now set to select the cabinets whose standards you want to change.
- To select a cabinet, simply move your mouse cursor to where it is touching the cabinet you want to change then click the left mouse button. The outline of the cabinet you.ve selected will change colors to a bright blue. This indicates which cabinets have been selected.
- Continue clicking on cabinets until you.ve highlighted all the cabinets that you want to change. You can click on the "Select All Cabinets" button if you want to change all the cabinets in this particular room.
Note: By clicking on a cabinet a second time causes the cabinet to become "unselected" and that cabinet then won't get its standards changed.
- Once you.ve selected all the cabinets in the group of cabinets you want to change, click on the "Prepare Standards" button. This will open up the standards window.
- You can now go in and manually change the standards you want changed for this group of cabinets. If you have already saved a set of standards in your list of standards files, you can simply click on the file menu and open the standards file you want applied to this group of cabinets.
- Once you've adjusted the standards, click on the "Apply to Selected Cabinet(s)" button. The changes are now in affect.
If you move your mouse cursor around, as it touches each cabinet information about that cabinet appears in the top of the Tool Box. Included in that information is whether a cabinet follows the Job Standards or its own individual Cabinet Standards. Remember, any cabinet that uses Cabinet Standards will not be affected if you change the Job Standards. To get a cabinet back to using Job Standards, simply click on the cabinet to select it. Then click on the "Apply Job Standards" button. This cabinet will now respond to any changes you make in the Job Standards.
Backs
In this section you set up the way backs will be placed in your cabinets, if your cabinets have backs at all. You are given separate controls for the way the backs are done in base cabinets and upper cabinets. Full height cabinets will follow the settings for base cabinets.
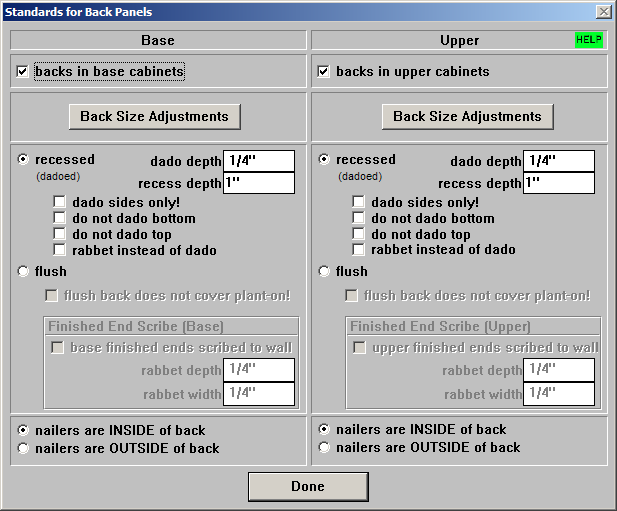
- Backs in Cabinets: If the cabinets are to have backs, click on the box until it is checked. If this box is not checked, no backs will be placed in your cabinets.
Back Size Adjustments:
- Extend top of back up(+) or down (-): Enter a positive number (+) to raise the top of the back. Enter a negative number (-) to lower the top of the back. This option is only available for: Dado/Rabbet Sides Only, Do Not Dado Top, and when the back is Flush.
- Extend btm of back up(-) or down (+): Enter a negative number (-) to raise the bottom of the back. Enter a positive number (+) to lower the bottom of the back. This option is only available for: Dado/Rabbet Sides Only, Do Not Dado Bottom, and when the back is Flush.
Center Back Size:
- Use Maximum Center Back Size: Check this box if you want to use the maximum size the Center Back Panel can be. This is helpful to optimize the saving of material.
- From Back Intersection: Enter the distance from where the Corner (Left) Back and the (Right) Back meet or intersect, and where the Center Back Panel will be placed.
- Recessed: If you are dado'ing or rabbet'ing the back into the box parts of the cabinet, click on the radio button until it is selected. When the backs are recessed, Cabinet Solutions allows the nailers to be placed both inside and outside the back. If you will be putting the nailers behind the back it is important to make sure that the recess depth is equal to or greater than the sum of the back thickness plus the nailer thickness.
- Dado Depth/Rabbet Depth: Enter the depth of the dadoes or rabbets that will be cut for the backs.
- Recess Depth/Rabbet Width: Enter the distance from the wall that the back is recessed. This distance is from the wall to the inside of the back depth. (Example: with 1/4 inch back material and 3/4 inch inset nailer, the dado recess/rabbet width is 1 inch.)
- Dado/Rabbet Sides Only: If you dado or rabbet your backs into your sides, but you cut your tops and bottoms short to slide your backs through, click your mouse to place a check in this box.
- Rabbet Instead of Dado: If you rabbet your backs instead of dado'ing them while the backs are recessed, then click your mouse to place a check in this box. Note: The rabbet width will not effect nailers unless they are outside the back.
- Flush: If you are not using dadoes or rabbets but instead will be placing the back flush on the cabinet, click on the radio button until it is selected. Note: Be aware, Cabinet Solutions allows you to place nailers inside or outside flush mounted backs. Be sure they are placed where you want them because if they go outside a flush back the size of the end panels will adjust to accommodate them.
- Finished Ends Scribed to Wall: If you are putting your backs on flush but you want to rabbet the back into the finished ends so that they will not be seen, click the check box until it is checked. Then enter the corresponding rabbet depth and width.
- Finished End Rabbet Depth: Enter the depth that the rabbet is cut into the finished end.
- Finished End Rabbet Width: Enter the width that the rabbet is cut into the finished end. (This distance is from the wall to the front side of the back). If the nailers are outside the back be sure that your recess width is equal to or greater than the sum of the back thickness plus the nailer thickness. (Example: with 1/4 inch back material and 3/4 inch nailer, the rabbet width should be at least 1 inch.)
- Nailers are Inside of Back --- This radio button will locate your nailer on the interior side of the base cabinet back. If there is no back, the nailer will be placed between the sides.
- Nailers are Outside of Back --- This radio button will locate your nailer on the exterior side of the base cabinet back. If there is no back, the nailer will be placed behind the sides.
Cabinet Heights & Depths (Initial Values)
In this section, you enter your standard cabinet dimensions. These dimensions are automatically used as defaults when you place cabinets. (Remember, you can change the dimension of a particular cabinet when you place the cabinet in the Place Cabinets Screen.)
- Base Height: Enter the standard base height from the floor to the top of the base cabinet. Do not include the counter top thickness.
- Base Depth: Enter the standard base depth from the wall to the front of the face of the cabinet. Do not include the depth of the door.
- Vanity Height: Enter the height from the floor to the top of the vanity. Do not include the counter top thickness.
- Vanity Depth: Enter the depth from the wall to the front of the face of the vanity. Do not include the depth of the door.
- Floor to Bottom of Standard Upper: Enter the distance from the floor to the bottom of the standard upper, (or wall cabinet). This dimension should be the sum of your base cabinet height, plus your counter thickness, plus the distance you desire between the top of the counter and the bottom of the upper cabinet. This value can be changed when an upper is placed in the Cabinet Sizing Window.
- Standard Upper Height: Enter the height of your standard upper cabinet. The job you are working on may not have a single standard height, for example the height of the uppers in the kitchen may be 36", while the uppers in the laundry room may be 42". However, at this point you are just defining the most typical upper height you use. Later when you select and place the upper cabinets, you will be able to set each upper placed to a specific height.
- Standard Upper Depth: Enter the standard upper depth from the wall to the front of the face of the cabinet. Do not include the depth of the door.
- Top of Refer to the Bottom of the Refer Upper: Enter the clearance between the refrigerator and the upper above it. This standard allows refrigerators that are not "built-in" to slide in and out easily.
- Refer Upper Height: Enter the standard height of the cabinet you want to place above a refrigerator.
- Refer Upper Depth: Enter the depth from the wall to the front of the face of the upper above the refrigerator. Do not include the depth of the door.
- Floor to Bottom of Hood Upper: Enter the distance from the floor to the bottom of the Hood Upper. (The Hood brochure will usually give the desired distance between the top of the range and the bottom of the hood.)
- Hood Upper Height: Enter the standard height of the cabinet you want to place above a slide-in range or cook top.
- Hood Upper Depth: Enter the depth from the wall to the front of the face of the hood upper. Do not include the depth of the door. You may want the hood upper to be deeper than the other cabinets because of the duct that often runs up behind the mullion in this cabinet.
- Full Height Cabinet Depth: Enter the depth from the wall to the face of the Full Height Cabinet.
NOTE: Normally, you want the Full Height Cabinet to be flush with the front of the adjacent counter top. Therefore, the depth of this cabinet will usually be greater than the depth of the adjacent base and upper.
- Full Height Cabinet Clearance: This standards was added to safe guard against getting a full height cabinet out on a job and not being able to stand it up in a room. This standard automatically shortens any full height cabinet you place by this amount and takes this dimension off the top rail height. (This is so the doors line up with any upper cabinets that were set to the ceiling.) This standard only exists for those of you who want the safeguard. Enter the desired distance from the top of the Full Height Cabinet to the ceiling.
Cabinet Standards
Sometimes there are individual cabinets or rooms full of cabinets that you want to build differently than the rest of the job. For example, if you are putting backs in your base cabinets, but get to a sink base that has so much plumbing in it that you would have to tear the back out to install the cabinet. In this case, you may want to change the standards for one individual cabinet. Cabinet Solutions allows you to make these changes through Cabinet Standards. They are standards that you can set, that affect only that one individual cabinet.
While Job Standards are typically set before you start laying out a job, Cabinet Standards must be changed after the cabinets have been placed. You could theoretically make each individual cabinet in a job with different standards, though you will probably find this feature most helpful when making one-of-a-kind pieces such as an entertainment center or bookcases within a particular job. A cabinet will have its own standards if and only if you change its Cabinet Standards.
Note: Once you have changed a cabinet's individual Cabinet Standards, any changes to your Job Standards will not affect that one cabinet. Resetting a cabinet to your Job Standards is possible in the Place Cabinet Screen.
There are two places that you can access and change a cabinet's individual Cabinet Standards. The first one you will encounter is in the Place Cabinets screen. When in this screen, the tool box at the right will have a button near the bottom labeled Assign Standards. This button puts you in a special mode in which you can select one or more cabinets and Assign them a new set of standards that will be different than the Job Standards. If at any time you forget which cabinets you have changed Cabinet Standards on, go into this Assign mode and touch each cabinet with your mouse (no clicking is necessary); the tool box will tell you which standards have been used for each cabinet.
The second place that you can give an individual cabinet a unique standards file is in the Edit Elevations screen. While in the Edit Elevations screen, you can select single cabinets and do a variety of customizing processes to them, including changing their Cabinet Standards.
Construction Methods
The first thing we want to establish is how you will be assembling your cabinets. If you use dado construction, there are places to put the depth of each dado. If you dowel or butt joint and screw your box parts simply turn off the dado box.
Face Frame Construction
- Butt Joint: If you join your face frame using the Castle Pocket method, or if you butt joint your frames using dowels or some other fastener, click on this radio button.
- Tenon & Mortise: If you tenon and mortise your frames together, click on this radio button and enter the depth of your tenon.
- Dado Cabinet to Face Frames: If you dado your box parts into your face frame, place a check in the check box in front of this option, and enter the depth you dado into the frame. This will add the needed depth to your box parts.
- Only Dado the Cabinet sides to the Face Frame: If you dado your boxes to your face frames, but only dado the sides in, check this box along with the box for Dado Cabinet to the Face Frame, and enter the size of the dado in the given box.
Cabinet Box Construction
Cabinet End Construction
These values only apply when the end panels are Same Size as Partitions or Side Panels Sit on Bottom. (See Construction Methods II)
Filler From Uppers to Ceiling
- Insert Fillers from Upper to Ceiling (Appears Only in Euro): If your upper cabinets are going to the ceiling, it is sometimes necessary to place a filler between the top of the cabinet and the ceiling. This is done to insure that your doors won't scrape on any variance in the ceiling when they open. Cabinet Solutions will automatically insert them when this box is checked.
Construction Methods 2
Top Panel Construction
- Tops in Uppers: Check this box if your upper cabinets have a top panels.
- Tops in Bases: Check this box if your base cabinets have a top panels.
End Panel Construction
As you know, the weight of your counter tops and base cabinets has to be transferred to the floor. Typically this is accomplished either through the side panels of the cabinet going to the floor or through a separate "toe" assembly that the cabinet sits on. Related to this is the length of your side panels. By default, Cabinet Solutions runs all the finished ends (or exposed ends) to the bottom of the face frame (if a face frame is being used.) The unfinished ends by default, do not go to the bottom of the face frame. They come down to the bottom of the bottom panel. Cabinet Solutions allows you to change this to where all the panels come down to the bottom of the face frame (UE Panels same height as FE Panels) or unfinished end panels can sit on the bottom like a partition by selecting (End Panels same size as Partitions). Finally, you can chose to run all your base end panels to the floor.
Upper
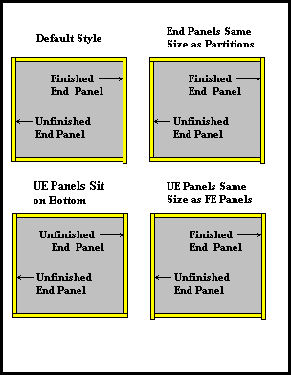
- Default: If you sandwich your top and bottom panels between your end panels and your unfinished end panels come down to the bottom of your cabinet bottom, then click this radio button.
- Top Not Sandwiched: If you sandwich your bottom panels between your end panels but do not sandwich your top panels between your end panels, check this box.
- End Panels same size as Partitions: If you sandwich your end panels between your top and bottom so all your vertical supports are of equal size, check this box.
- UE Panels Sit on Bottom: If your unfinished end panels come down to the top of your cabinet bottom, check this box.
- Widen Bottom To Edge of Stile (Euro only): If you would like the edge of your bottom panels to be flush with the outside edge of the stile, check this box. This is useful for closing the gap between cabinets or when against a wall.
- UE Panels same height as FE Panels: If your unfinished end panels come down to the bottom of your face frame, like your finished end panels, check this box.
Bases
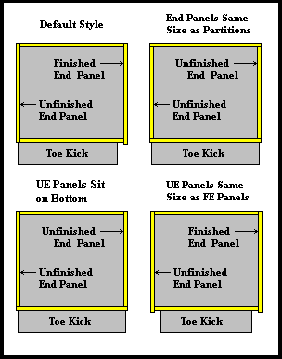
- Side Panels Touch Floor: If you run your end panels to the floor rather than placing a separate toe kick on each cabinet click on this radio button.
- Toe With Sleepers (Default): If you put on a separate toe so your end panels do not extend to the floor and you sandwich your tops and bottoms between your end panels, turn on this radio button and only this button. This is also the radio button to have on if you use leg levelers.
- Top Not Sandwiched: If you sandwich your bottom panels between your end panels but do not sandwich your top panels between your end panels, check this box.
- End Panels same size as Partitions: If you sandwich your end panels between your top and bottom so all your vertical supports are of equal size, check this box.
- UE Panels Sit on Bottom: If your unfinished end panels come down to the top of your cabinet bottom, check this box.
- Widen Bottom To Edge of Stile (Euro only): If you would like the edge of your bottom panels to be flush with the outside edge of the stile, check this box. This is useful for closing the gap between cabinets or when against a wall.
- UE Panels same height as FE Panels: If your unfinished end panels come down to the bottom of your face frame, like your finished end panels, check this box.
Extended End Construction Method
Extended Ends (sometimes referred to as blind corner cabinets) can be configured in a number of different ways depending on how you fasten on the cover panel.
To specify the extended end construction method:
- Click on the check box indicating whether you will be attaching a cover panel or not.
- Enter the cover panel thickness in the entry field.
- Next, click on the radio button for either insetting or flush mounting the cover panel.
- If you are building Euro cabinets, another option is given to you, that is to make the cover panel one piece with the extended end filler or two separate pieces.
- Add Cover Panel: A check in the check box indicates you will be attaching a cover panel. Click the box to remove the check and the cover panel will be left off your cut list.
- Cover Panel Thickness: Enter the cover panel thickness in the entry field.
- Inset Cover Panel: Set this radio button if you fasten the cover panel between the bottom and the top of the cabinet (or top front stretcher). Note: If you change this option to flush after you place the return cabinet, the return cabinet's measurements will be wrong because it will reflect the difference of the cover panel thickness.
- Flush Cover Panel: Set this radio button if you fasten the cover panel over the front edge of the top and bottom of the cabinet. Note: If you change this option to inset after you place the return cabinet, the return cabinet's measurements will be wrong because it will reflect the difference of the cover panel thickness.
- (Euro Only) Filler Plus Cover Panel: Check this box if your cover panel and corner filler piece are 2 separate pieces in your corner assembly. You can still fasten the cover panel as an inset piece or a flush piece.
Radius Construction
Radius cabinets can be configured with or without a cover panel.
To specify the radius construction method:
- Click on the check box indicating whether you will be attaching a cover panel or not.
- Enter the cover panel thickness in the entry field.
- Add Cover Panel: A check in the check box indicates you will be attaching a cover panel. Click the box to remove the check and the cover panel will be left off your cut list.
- Cover Panel Thickness: Enter the cover panel thickness in the entry field.
Counter Tops
Although Cabinet Solutions does not currently produce a cut list for counter tops, the information that you place in these standards will be used for both your presentation pictures, and also for your job costing of counter tops.
Counter Top Parts You Can Specify Sizes For:
- Remove Top: Click this button if you wish to entirely remove the countertop. (This will set all values to 0"). This makes it fast and easy to remove the countertop from a cabinet.
- Thickness: Enter the thickness of the counter top, (this should be the front edge thickness.)
- Default (& Corner Cabinet Right) Backsplash Height: Enter the height of your backsplash. On Corner and Extended End cabinets, this will be called Right Backsplash Height.
- Left Backsplash Height (Corner Cabinets Only): Enter the height of your adjacent (left) backsplash for Corner and Extended End cabinets.
- Front Overhang: Enter the distance you want your counter top to overhang the front of your cabinets. Tip: This distance should almost always be greater than you door thickness so that anything that spills off the counters will not run into the cabinet.
- Finished End Overhang: Enter the distance you want your counter top to overhang the finished ends of your cabinets.
Doors & Drawer Fronts
In this section you will choose the door style you want on your cabinets in this job. Cabinet Solutions allows you a lot of flexibility in placing doors. You can place a different door styles on upper cabinets than on base cabinets and different styles on drawers. Later in this manual you will learn how to change the door style of any cabinet within a room or even change the door style of one particular opening in a cabinet. The door standard section allows you to enter the standards that control the production of the cut list for the door parts. Even if you do not build your own doors, you may want to set the sizes to the approximate size that your door company uses so your pictures will most closely represent what the customer will actually be getting.
To select a door style:
- Click on the button in standards labeled Doors + Drawer Fronts.
- In the window that opens, choose between Upper Doors, Base Doors or Drawer Fronts.
- Click on the "Basic Door Style" you want for the cabinets. The styles are as follows:
- slab door with vertical grain
- lab door with horizontal grain
- square frame door
- square frame miter door
- square frame door with simple top arch
- square frame door with simple top & bottom arch
- square frame door with compound top arch
- square frame door with compound top & bottom arch
- Select the "Panel Style" if you are using any of the frame doors:
- glass (including mirrors)
- raised
- recessed
- frame only (no panels)
- one-piece recessed back (also called a back panel door)
Note: If you selected to use a "slab door" a check box and an entry field will appear that allow you to choose to use edging on the doors and to give that edging a thickness.
- "French Lites" is a term used to describe the divisions of the door panel. This is most commonly used with glass doors but in Cabinet Solutions you can divide wood panels also. Check the box if you want to divide your panel. Use the radio buttons below to set these divisions as structural (where you will have multiple panels within the door) or non-structural (which will just give you a single panel with decorative mullions over the top).
- Set wainscot if you wish divide the door into wainscot panels. Set the number of panels or lites to use in the edit field below in the dialog window. Click on the button labeled "Wainscot Standards" to set up the standards that Cabinet Solutions will use to build your wainscot doors.
- Use the "Material" button to set the material for the door frame and panel.
- Next, set the overlays to the right of the window. In face frame, the overlays are referenced to face frame pieces. In Euro, the overlays are referenced by location. It is important that you set your overlays correctly because Cabinet Solutions uses them to determine your door sizes.
- over top rail (top most)
- over bottom rail (bottom most)
- over left stile (left most)
- over right stile (right most)
- top over center rail (horizontal)
- bottom over center rail (horizontal)
- left over mullion (vertical)
- right over mullion (vertical)
- Next, click on the button labeled "Knobs/Pulls" to set up the placement of knobs or pulls that Cabinet Solutions will use to place on your doors and drawer-fronts.
- Next, click on the button labeled "Other Standards" to set up the standards that Cabinet Solutions will use to build your doors.
Doors & Drawer Fronts Other Standards
Explanation of Each Door Standard:
- Frame Thickness: Enter the thickness of the door frame.
- Panel Thickness: Enter the thickness of the door panel.
The following 4 standards for left & right stile and top & bottom rail widths should be given finished sizes. If you cut these pieces oversize and then trim small amounts off when the panel groove is cut and the edge detail is put on, there will be other standards to use to enter that information so your cut-list is correct.
- Left Stile Width: Enter the finished width of the left stile.
- Right Stile Width: Enter the finished width of the right stile.
- Top Rail Width: Enter the finished width of the top rail.
- Bottom Rail Width: Enter the finished width of the bottom rail.
- Arch Depth: Enter the depth you cut into your top rail if you are using a door stile that has an arched top here.
- Panel Size Less: Enter the amount you want to subtract off your panels to allow for expansion and contraction here.
- Groove Depth: Enter the depth you cut the groove in your stiles and rails to receive the panel here. You may refer to this cut as a "cope" depth.
- Amount Trimmed-Off with Groove: Enter the amount you will trim off your stiles rails when you run your groove for your panel.
- Amount Trimmed-Off with Edge Detail: Enter the amount you will trim off your stiles rails when you run your edge detail on your doors.
- Gap Between a Door Pair: Enter the size of gap you want between a pair of doors here. (That is 2 doors that cover 1 opening.)
- Add Center Rail When Height >: Doors panels will often bow if they get too large in size. To help eliminate this problem, many shops want to add a center rail into the door if the door exceeds a certain size. Enter the size of door that when exceeded you want the program to automatically place a center rail.
- Center Rail Width: Enter the width you want the center rails to be when the program adds them here.
- French Lite Center Rail Width: Enter the width you want the center rails (horizontal face frame piece) to be when you are adding "French Lites".
- French Lite Mullion Width: Enter the width you want the mullions (vertical frame piece) to be when you are adding "French Lites".
- French Lite Thickness: Enter the thickness of the French Lite parts.
Center Rail Style
Earlier you set a standard to add a center rail when a door gets to a certain size. This section will control how that added center rail will be cut. You may be arching your top or bottom rail. Do you want an arch cut in the center rail? Do you want it arched for the bottom panel only or both the top and bottom panels?
- No Arches: This option will always put a straight center rail in your doors.
- Arch Top Edge Only: This option will cut an arch in the top side of the center rail.
- Arch Bottom Edge Only: This option will cut an arch in the bottom side of the center rail.
- Arch Top and Bottom Edges: This option will cut an arch in the top and bottom side of the center rail.
Drawers
In this section, you will enter the different specifications regarding how you build your drawers.
Explanations of Drawer Box Construction Methods:
Drawer Box Style:
- Drawer Box plus Front: This style is made up of a four sided box with a bottom. The drawer front is then attached to the box as a sixth piece.
- Drawer Box includes Front: This style is constructed using the actual drawer front as a structural piece of the drawer. The sides and bottom are typically dadoed or dovetailed into the drawer front.
Drawer Box Joint:
- Butt Joint Drawer Box: This method sandwiches the front and back between the sides without any overlap between them. There are a variety of ways the parts are fastened together including dowels, nails, screws, etc.
- Dado Drawer Box: This method sandwiches the front and back between the sides, overlapping the sides into a groove of some kind (dado, or rabbet) that is cut into the sides.
- Dovetail Drawer Box: This method attaches the box parts together using a full dovetail joint. The front and back of the drawer box extend out to the edge of the overall drawer box and the sides run the full length of the drawer box.
- Half-Blind Dovetail Drawer Box: This method attaches the box parts together using a half-blind dovetail joint. The front and back of the drawer box extend out to the edge of the overall drawer box and the sides run part way into the front and back, being attached using a half-blind dovetail joint.
Drawer Bottom Assembly:
- Flush Bottom: This assembly method places the bottom of the drawer directly on the bottom of the drawer box front, back, and sides.
- Dado Bottom: This assembly method places the bottom of the drawer inside of the drawer box front, back, and sides. The 4 box parts have dadoes cut in them that the bottom fits into.
- Slide-in Bottom: 3 Sided: This assembly method places the bottom of the drawer inside of the drawer box front and sides, while the back is left short so that the bottom can slide into the groove in the other 3 parts.
- Slide-in Bottom: 2 Sided: This assembly method places the bottom of the drawer inside of the drawer box sides, while the front and back are left short so that the bottom can slide into the groove in the sides.
Explanation of Drawer Box Standards
- Drawer Height: Opening Less: Subtract the Drawer Height from the height of the opening. Enter the resulting number. This number will determine the height of the drawer box parts. (Some drawer guide manufacturers list the clearance needed between drawer box and drawer opening. Do not enter the desired drawer height but how much smaller the drawer height is than the opening height.)
When Multiple Drawers are in an Opening:
- Drawer-Front Height Less: Edit Elevations contains instructions for putting multiple drawers in a single opening. In those cases, Cabinet Solutions needs to know how much smaller than the drawer-front the drawer needs to be. Enter that size here.
- Drawer-Box Width - Opening Less: Subtract the drawer width from the face frame opening width. Enter the resulting number. (This number will depend on the type of hardware you are using and the space you need for the drawer guides.
- Drawer-Box Depth (Standard, Vanity, Full-Height Cabinets):
- Depth is Constant: Check this box if all of your drawers for this type of cabinet are a constant depth.
- Drawer Depth: Enter the depth of your drawers for this type of cabinet if you checked Depth is Constant.
- Cabinet Depth Less: Subtract the drawer depth from the depth of the cabinet. Enter the resulting number. (This number will determine the depth of the drawer and will avoid having drawers that extend to the back of the cabinet.)
- Gap Between Drawer-Fronts: Edit Elevations contains instructions for putting multiple drawers in a single opening. To accurately calculate the drawer-front sizes, Cabinet Solutions needs to know what size gap to put between the drawer-fronts.
Drawers (Initial Values)
These initial values will setup your drawer banks and the top drawer opening in your base cabinets to the entered values. Use whatever values you most commonly use. There will be ways to modify this later in the program. At this point we are just looking for the numbers you will most often be using in this job.
Note: Theses 4 drawer standards can be changed later in the Edit Elevations screen by adjusting it using the Edit Openings feature.
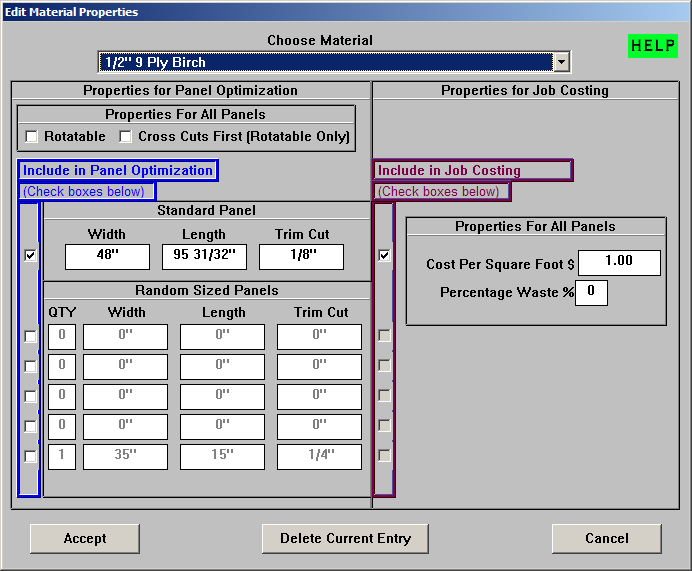
Edit Material Properties
- Choose Material: At the top of this dialog box there is a scroll list of all the materials in your material list. Click on the down arrow to see what is in the list, then click on the name of each material to set the properties for that material.
Properties for Panel Optimization
Properties For All Panels:
- Rotatable: Place a check in the check box if the parts placed on this sheet can be rotated in either direction. Obviously this is only true of non-grained material such as melamine.
- Cross Cuts First (Rotatable Only): Place a check in the check box if you will be doing Cross Cuts first on these parts instead of Rip Cuts first (can be used for CNC operations). If you have not already checked "Rotatable", it will be checked automatically for you.
Standard Panel:
The Standard Panel is the panel you carry in stock on a regular basis.
- Include in Panel Optimization: In the check box to the left, indicate if you want the standard panels to be run through the Optimizer.
- Panel Size: Enter the panel size you order each material in, and enter the size of trim you cut off each sheet before you start cutting parts.
- Include in Job Costing: If you want to include these panels in your job costing, click on the check box to the right.
Random Sized Panels:
- Random Sized Panels are panels that you may have laying around the shop that have been previously cut, but are still usable. These may also be called "Scrap Sheets".
- Include in Panel Optimization: In the check box to the left of each Random Sized Panel, indicate if you want the those panels to be run through the Optimizer.
- QTY: Enter the quantity of each set of Random Sized Panels that all have the same sizes.
- Panel Size: Enter the panel sizes of any random sized panels you may have laying around the shop. Then, enter the size of the trim you cut off for that sheet before you start cutting the parts.
- Include in Job Costing: If you want to include these panels in your job costing, click on the check box to the right.
Properties for Job Costing
Properties for All Panels:
- Cost Per Square Foot: In the edit field provided, enter your cost per square foot for each material in the list.
- Percentage Waste: Enter a % waste for the material only if it applies. If you will be running all your panel stock through the Optimizer, than the Optimizer will add in your waste. However, for solid stock, a waste factor is necessary.
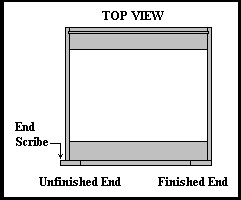
End Scribe Clearance
End scribe is the amount that the face frame overhangs the right or left end of the cabinet to accommodate out of square walls. This information appears in the assembly sheets so that the face frame can be place on the box correctly.
You can Specify Scribe for These Types of Cabinet Ends:
- Finished End Scribe: Enter the amount of scribe for finished ends. (Note: scribes on finished ends are seldom used.)
- Unfinished End Scribe (Cab to Cab): Enter the amount of scribe for the unfinished end of a cabinet that meets the unfinished end of another cabinet. (Often a space between unfinished end panels of cabinets is desired in case the walls are crooked. To prevent gaps at the faces of the cabinets, scribe is left on the face frame.)
- Unfinished End Scribe (Base to Wall): Enter the amount of scribe for the unfinished end of each base cabinet that goes against a wall. (In case the wall is out of square, often one leaves a scribe for a base cabinet that abuts a wall.)
- Unfinished End Scribe (Upper to Wall): Enter the amount of scribe for the unfinished end of each upper cabinet that goes against a wall. (In case a wall is out of square, often one leaves a scribe for an upper cabinet that abuts a wall.)
- Unfinished End Scribe (by Appliance): Enter the amount of scribe for the unfinished end of a cabinet that is next to an appliance, such as a dishwasher. (Often, a scribe next to an appliance is used to make sure the appliance can slide in and out easily and can be shaved if necessary.)
- Extended End Wall Clearance (Base): (Extended End may be a new term for some. Extended End Cabinets are the same thing as "Blind Corner Cabinets".) Enter the distance between the wall and the end panel of the base extended end. (In case the walls are out of square, one often leaves some distance here so that the line of cabinets is not affected.)
- Extended End Wall Clearance (Upper): (Extended End may be a new term for some. Extended End Cabinets are the same thing as "Blind Corner Cabinets".) Enter the distance between the wall and the end panel of the upper extended end. (In case the walls are out of square, one often leaves some distance here so that the line of cabinets is not affected.)
- Return End Scribe (Base): (Return Cabinets are simply the cabinet that is placed in the corner, adjacent to the Extended End.) Enter the amount of scribe for the return end of the base cabinet. (This allows a different scribe between the extended end and the return end in case the walls are out of square.)
- Return End Scribe (Upper): (Return Cabinets are simply the cabinet that is placed in the corner, adjacent to the Extended End.) Enter the amount of scribe for the return end of the upper cabinet. (This allows a different scribe between the extended end and the return end in case the walls are out of square.)
- Top Scribe for Upper Cabinets: If you hold the top of your upper cabinet down from the top of the top rail, enter the amount of scribe here.
- Top Scribe for Full Height Cabinets: If you hold the top of your upper cabinet down from the top of the top rail, enter the amount of scribe here.
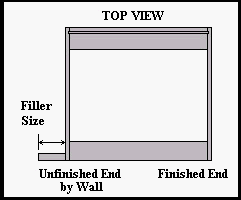
Fillers
This standard only appears when your standards are set to do Euro style construction as there are no end scribes in Euro because there is no face frame. However, it is still necessary to keep your cabinets and cabinet doors away from walls and ceilings. In Euro style, this is done with fillers.
In this section, you specify the size of fillers in the different situations you will find yourself in. These fillers will be automatically placed in for you when you place your cabinets.
Note: If you set a filler size to 0", no filler will be placed in that situation.
Explanation of where filler will be automatically placed:
- Filler Width (base to wall): This filler is helpful in two ways; 1. It gives some space between your cabinet and the wall so that your doors can open further, 2. It gives you a piece that you can scribe to the wall if it is out of plum. Enter the size of the filler you want between your base cabinet and the wall.
Note: This is the filler placed at the end of a run of base cabinets and the wall. A different standard will be used for blind corners.
- Filler Width (upper to wall): This filler is helpful in two ways; 1. It gives some space between your cabinet and the wall so that your doors can open further, 2. It gives you a piece that you can scribe to the wall if it is out of plum. Enter the size of the filler you want between your upper cabinet and the wall.
Note: This is the filler placed at the end of a run of upper cabinets and the wall. A different standard will be used for blind corners.
- Filler Width (by appliance): There are situations in which you may want a filler between a cabinet and an appliance. For example, a particular appliance might come with a trim kit that you want to use. Adding a filler gives you something to connect that trim kit to. Enter the size of the filler you want between your cabinets and an appliance.
- Return End Filler (base): This filler allows you to create a corner space in a base blind corner situation. This is needed so that doors and drawer fronts aren.t bumping and binding with each other in the corners. Enter the size of the filler you want between your return end base cabinet and the extended end base cabinet, (blind corner cabinet).
- Return End Filler (upper): This filler allows you to create a corner space in a upper blind corner situation. This is needed so that your doors aren.t bumping and binding with each other in the corners. Enter the size of the filler you want between your return end upper cabinet and the extended end upper cabinet, (blind corner cabinet).
- Extended End Corner Space (base): his dimension is used for either the extension of the Cover Panel or the width of the Cover Panel Filler. Its purpose serves the same as a return end filler in that it is the second half of the space needed in a corner. This is needed so that your doors aren.t bumping and binding with each other in the corners. Enter the dimension you want to add to your base extended end cover panel. To include a Cover Panel Filler, see Construction Methods II in Standards.
- Extended End Corner Space (upper): This dimension is used for either the extension of the Cover Panel or the width of the Cover Panel Filler. Its purpose serves the same as a return end filler in that it is the second half of the space needed in a corner. This is needed so that your doors aren.t bumping and binding with each other in the corners. Enter the dimension you want to add to your upper extended end cover panel. To include a Cover Panel Filler, see Construction Methods II in Standards.
- Extended End Wall Clearance (Base): (Extended End may be a new term for some. Extended End Cabinets are the same thing as "Blind Corner Cabinets".) Enter the distance between the wall and the end panel of the base extended end. (In case the walls are out of square, one often leaves some distance here so that the line of cabinets is not affected.)
- Extended End Wall Clearance (Upper): (Extended End may be a new term for some. Extended End Cabinets are the same thing as "Blind Corner Cabinets".) Enter the distance between the wall and the end panel of the upper extended end. (In case the walls are out of square, one often leaves some distance here so that the line of cabinets is not affected.)
- Add filler when cabinets differ in depth by: There are times when two cabinets will be next to each other, but one cabinet, (like a full height pantry), may be so much deeper than the cabinet next to it, that it needs to be treated like a wall and have a filler placed between it and the cabinet next to it. This is the place where you can set the depth differences where you would like this to happen. If you never want it to happen, just put in a very large depth difference, like 50", and you should never have to worry about it.
General Setup
Initial Values
The first button in the left hand column is called Initial Values. This set of standards includes sections for setting what are called initial values for: Appliances, Cabinet Heights and Depths, Windows and Doors, Drawers, Nailers and Stretchers, Shelves, Fillers (for Euro only), and Radius and Clipped Cabinets. This section is first because the standards set here work a little differently than the rest of the standards. Standards are the specifications for the way you build your cabinets. All other standards not under this Initial Values section can be changed again and again and at any time during the course of a job and those changes will be reflected in your display and cut list. The information set in the Initial Values section only affects the cabinet at the time of sizing and placement.
To help you better understand this distinction, let's compare 2 different standards. First, let's look at the way a regular shelf standard works. In Job Standards, click on the Shelves button. In the window that opens you will see a setting for the dado depth of a base fixed shelf. This refers to the depth that any fixed shelf, placed in a base cabinet, that will be dadoed into the sides of that cabinet. The factory default for that standard is 1/4". So, if you were to place 4 base cabinets all with 1 fixed shelf, those shelves would all be dadoed into the sides of their respective cabinets by 1/4". If after you placed those 4 cabinets you changed that standard to 1/8", those shelves would all resize to reflect the new value you.ve entered. The standards in the Initial Values section work differently.
In Job Standards, click on the Initial Values button and then click on the Shelves button. Here you can set the typical number of fixed shelves you want in an upper cabinet, the factory default being 2. If you were to place 4 upper cabinets in a job they would all have 2 fixed shelves in them. If you want to change them later, you can NOT do it by changing Standards. If you change the settings in Standards to 1 fixed shelf per base, any future cabinets you place will have just 1 shelf, but the first four cabinets you.ve placed will still have 2 shelves each. There are other ways of changing the number of shelves later in the program, but Job Standards will not work.
Job Standards
In general, most cabinets within a job are made the same way; i.e. the same materials, the same construction methods are used. For this reason, Cabinet Solutions has what are called Job Standards. This is the general standards file that will be given to each cabinet when it is originally made, or placed. Job Standards should reflect the way you will be building most of the cabinets in the job and it should be the very first thing you setup when you start a new job.
The idea behind Job Standards is to give you a fast and easy way to give each cabinet in the job a standards file. Another aspect to Job Standards is that they not only determine the cabinet's standards file when it is created but also, Job Standards can be used to change the standards file of all the cabinets in a job if you have made a mistake in your original setup or if the customer changes something on you.
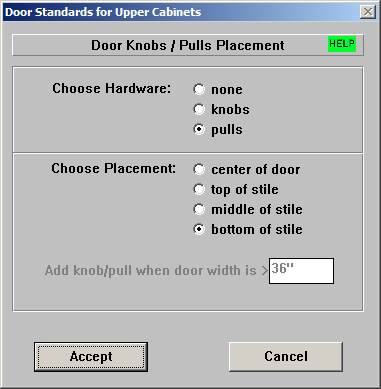
Knobs / Pulls
You can customize the placement of knobs or pulls in Job Standards for your Upper Doors, Base Doors, and Drawer Fronts. You can even customize each individual opening's knob or pull placement through Openings / Rollouts.
Choose Hardware:
- None: Click this radio button if you will not be using any knobs or pulls for this door.
- Knobs: Click this radio button if you will be using knobs for this door.
- Pulls: Click this radio button if you will be using pulls for this door.
Choose Placement:
- Center of Door: Click this radio button if you would like the knob or pull to be centered on the door. This is useful for drawer-fronts, etc.
- Top of Stile: Click this radio button if you would like the knob or pull to be placed at the top of the stile. If you are doing European construction, the knob or pull will be placed at the top edge of the door.
- Middle of Stile: Click this radio button if you would like the knob or pull to be placed in the middle of the stile (vertically). If you are doing European construction, the knob or pull will be placed in the middle edge (vertically) of the door.
- Bottom of Stile: Click this radio button if you would like the knob or pull to be placed at the bottom of the stile. If you are doing European construction, the knob or pull will be placed at the bottom edge of the door.
- Add Knob/Pull When Door Width Is ›: If you would like an extra knob or pull added when the door's width is greater than a certain amount, then enter that width here. The knobs or pulls will be positioned proportionally to the edge of the door. This is useful for drawer-fronts that need two knobs or pulls. (If you would not like an additional knob or pull added then make the amount very large so that the width would never exceed that amount.)
Material Thickness
In this section you specify the thickness of the cabinet parts.
Cabinet Parts You Can Specify the Thickness For:
- Face Frame (Edging in Euro): Enter the finished thickness of the frame that you will attach to the box.
BOX PART THICKNESS
- Tops: Enter the thickness of the exterior horizontal box parts. These include the tops of both the base and upper cabinets.
- Bottoms: Enter the thickness of the exterior horizontal box parts. These include the bottoms of both the base and upper cabinets.
- Fillers: Enter the thickness of your fillers. The filler thickness will be used for all fillers in the job including fillers in Extended End cabinets.
- Finished Ends: Enter the thickness of your finished end. If you will be using a Plant-On Finished End (also called an applied end), there will be instructions on how to do that in Edit Elevations in the Modifying End section. The finished end thickness will be used for all finished ends that are not Plant-ons.
- Unfinished Ends: Enter the thickness of the unfinished ends. Unfinished ends are the end pieces that separate one cabinet from another.
- Tray Dividers: Enter the thickness off the tray dividers. Tray dividers are defined as any internal partition that does not sit behind a face frame piece or in Euro it is an internal cabinet divider that doesn't affect the cabinets door openings.
- Wood Shelves ("Horizontal Partitions + Shelves" in Euro): Enter the thickness of the interior horizontal box parts (shelves). This allows you to use a different thickness for parts that are not as structurally critical.
- Glass Shelves: Enter the thickness of the interior horizontal box parts (shelves) that you have marked to be glass. This allows you to use a different thickness for glass shelves different from wood shelves. To mark a shelf as being glass, see Adjust Shelves.
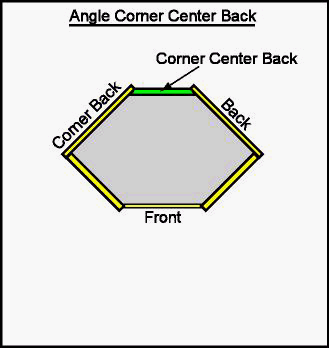
- Corner Center Backs (in Euro only): Enter the thickness of the center backs in Angle Corner cabinets. The center back is the back panel that is between the Corner (Left) Back Panel and the Back (Right) Panel. This panel is only used in European construction.
- Partitions (Vertical Partitions in Euro): Enter the thickness of the partitions. Partitions are panels that vertically divide individual cabinets but sit behind a face frame piece (mullion or mullion stile or center stile). They are a key part in making custom face frame cabinets and will be discussed at length in Chapter 8.
- Backs: Enter the thickness of your back material. If you are not using backs in this particular job you can leave them out in the standards for backs. You may still leave your standard back thickness.
- Toes: Enter the thickness of the material you use to make the toe parts.
- Stretchers: Enter the thickness of the stretchers.
- Nailers (Uppers): Enter the thickness of the nailers in the upper cabinets.
- Nailers (Bases): Enter the thickness of the nailers in the base cabinets.
- Spreaders (Euro Only): In Cabinet Solutions, Users building using Euro construction can place pieces between drawers in their base cabinets. We call these pieces spreaders. Enter the thickness of the spreaders.
ROLL-OUT THICKNESS
- Sides: Enter the thickness of the side material. The roll-out box sides will run from front to back and will overlap the front and back of the roll-out box.
- Fronts & Backs: Enter the thickness of the front and back material. The roll-out box fronts and backs run between the sides.
- Bottoms: Enter the thickness of the roll-out box material. The method of fastening is covered under Roll-Outs.
Material Type
In the Material Type section, specify the materials you will use for each of the cabinet parts. Material types can be specified for entire jobs but you can also change specifications for individual cabinets within a job. Material Type has been split into 2 sections; Cabinet Materials and Drawer Box / Roll-out Materials.
To Choose a Material:
- Click on the down arrow after the name of the material for the cabinet part.
- Use the arrows next to the drop down list to scroll through the list of materials.
- Click on the name of the material you want for the cabinet part.
To Add a Material to the Materials List:
- Click on the Edit Material List button at the bottom of the dialog box.
- Click on the Add New Material Type button.
- Type your new material type in the edit field.
- Click on the Accept button when you've finished typing in your new material.
Note: If you click on the Cancel button in either the Add New Material Type dialog box or the Edit Material List, your new material type will be canceled from the list.
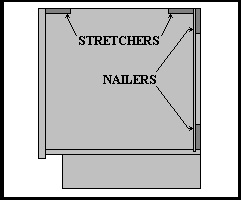
Nailers and Stretchers
In this section you enter specifications regarding nailers and stretchers. Nailers refer to the structural pieces of the cabinet that fasten it to the wall. Stretchers refer to the structural pieces in the tops of the cabinets that replace the tops. The thickness of nailers and stretchers is entered into the "Material Thickness" standards window. The program determines their overall lengths based on your construction methods. In this section you will need to enter the width of the nailers and stretchers when they are in different positions. For some of you the widths will all be the same. Please fill out all the entry fields.
If you only use 1 nailer, Cabinet Solutions will place that nailer in the top of the cabinet. If you use 2 nailers, Cabinet Solutions will place one nailer in the top of the cabinet and one in the bottom. If you use more than 2 nailers, the additional nailers will be placed in between the top and bottom and will use the Middle Nailer Size.
Note: If a nailer falls behind a shelf, the shelf is dominant and the nailer never gets dadoed.
Stretchers are done in a similar fashion. If you use 1 stretcher, it will be placed in the front of the cabinet. If you use 2 stretchers, 1 will be placed in the front of the cabinet and the 2nd will be placed in the back of the cabinet. If you use more than 2 stretchers, the additional stretchers will be placed between the front and the back and will use the Middle Stretcher Size.
Nailers & Stretchers (Initial Values)
These initial values will setup your cabinets with nailers and stretchers. Use values that are most common in your cabinets. If you never use nailers or stretchers just put 0 in for these standards. A note if you use stretchers and nailers: it is easy to get rid of too many nailers in a cabinet later but you can't add them if they aren't already in the cabinet. Therefore, set these initial values to whatever would be the greatest number of stretchers or nailers you'd want in an upper or a base.
- Initial Number of Nailers per Base: Enter the number of nailers you want in each base cabinet.
- Initial Number of Nailers per Upper: Enter the number of nailers you want in each upper cabinet.
- Initial Number of Nailers per Full Height: Enter the number of nailers you want in each full height cabinet.
- Initial Number of Stretchers per Base: Enter the number of stretchers you want in each base cabinet.
Opening a set of standards:
- Enter the "Job Standards" window, either through the "Adjust Job Standards" button in the "Start-Up Screen" or through the "Adjust Job Standards" option in the menu bar.
- Click on the word File in the menu bar of the Standards window.
- In the drop down list that appears you will see an option to Open Standards, select this option.
- In the list that appears, select the standards that you would like to open by clicking on the name once. It will appear in the top space of that list.
- Click on the Open button.
These standards are now set as the Job Standards for this job. You can use these standards just as they are or you can change them if you need to for this job. This same process can be used to set the standards for individual cabinets as well. Just pick the individual cabinets you want to change and follow the above steps to give the cabinet a new standards file.
Note: The standards FF_FAC, and EURO_FAC, are the files for the Cabinet Solutions factory defaults. They only exist as samples to be used when experimenting with your new program.
Note: Just because you click the Euro or Face Frame button in the "Job Standards" window, does not mean the corresponding standards file is loaded. You may still need to follow the steps above to load a specific standards file.
Radius & Clipped Cabinets
When placing radius and clipped cabinets, you have the option to include an unfinished panel between the connecting cabinets. If you include the unfinished end panel, you will have two unfinished end panels between the standard cabinet and the radius or clipped cabinet. If you do not include the unfinished end panel, you will only have one unfinished end panel between the standard cabinet and the radius or clipped cabinet.
Note: If you chose NOT to include the unfinished end panel and you place a radius or clipped cabinet, you will not be able to get that unfinished end panel back by including it through Initial Values later on. You will have to delete the radius or clipped cabinet and replace it.
Radius Cabinets
- Include Unfinished End Panel: Click on this check box if you want to include an unfinished end panel for radius cabinets.
Clipped Cabinets
- Include Unfinished End Panel: Click on this check box if you want to include an unfinished end panel for clipped cabinets.
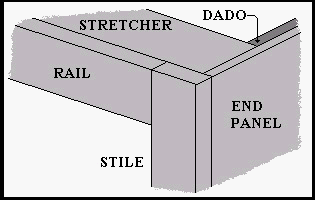
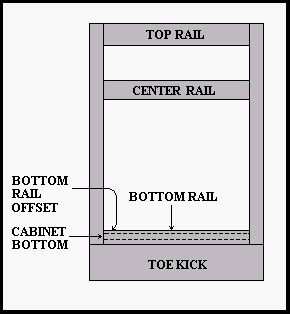
Rails
In this section you enter widths for different types of rails. The thickness of the rails is entered under material thickness (face frame) and the length of the rails is automatically calculated for each cabinet.
Note: Rails will be disabled in Euro.
Explanation of Each Rail Width
- Top Rail (Base): Enter the width for the uppermost rail in a standard base cabinet.
- Top Rail (Upper): Enter the width for the uppermost rail in a standard upper cabinet.
- Top Rail (Vanity): Enter the width for the uppermost rail in a standard vanity cabinet.
- Center Rail (Base): Enter the width of the rail that horizontally divides the standard base cabinet.
- Center Rail (Full Height): Enter the width of the rail that horizontally divides the full height cabinet.
- Bottom Rail (Base): Enter the width of the lowermost rail in a standard base cabinet.
- Bottom Rail (Upper): Enter the width of the lowermost rail in a standard upper cabinet.
- Bottom Rail Offset: If your bottom rail is not flush with the bottom of the cabinet, enter here the amount you want the bottom rail to be above the bottom of the cabinet. For most cabinetmakers who flush the bottom of the cabinet with the top of the bottom rail, this size will be zero.
Roll-Outs
In this section you enter specifications regarding roll-outs or roll-out shelves. These specifications allow for a vast variety of roll-out designs.
Explanation of Roll-Out Construction
Note: Explanations for the construction methods of the roll-out are the same as those for drawers.
- Roll-Out Height - Back: Enter the height for the back of the roll-out. (If you want a sliding shelf, enter 0 for the back height.)
- Roll-Out Height - Front: Enter the height for the front of the roll-out. This height may be less than the height of the back to allow easy access to pots, pans, etc. (If you are using a sliding shelf, enter 0 for the front height.)
- Roll-Out Height - Sides: Enter the height of the sides of the roll-out. The height of the sides may be equal to the back, to the front, or neither. If the sides taper from the back height to a lower front height, enter the largest height the sides will be. (Enter 0 if there will be no sides.)
- Roll-Out Width - Opening Less: Subtract the width of the roll-out from the width of the face frame opening. Enter the resulting number. (The width of the roll-out may need to be smaller than the width of the face frame opening due to the hinges used on the doors and the guides used on the drawers.)
- Roll-Out Depth - Cabinet Depth Less: Subtract the depth of the roll-out from the depth of the cabinet. Enter the resulting number.
Saving a set of standards:
- Enter the Job Standards window, either through the "Adjust Job Standards" button in the "Start-Up" screen, or through the "Standards" option in the menu bar.
- Once the Job Standards have been set in the manner you want, click on the word File in the menu bar of the Job Standards window.
- In the drop down list that appears, you will see an option to Save Standards, select this option.
- Next, a small window will open. A small, vertical, black bar ( | ) should be flashing in the open box near the top of the window. (If the bar is not there for some reason, click your mouse in side that box, and the bar should appear.) Using your keyboard, type a name that you would like to use to distinguish these standards from the others you may save to disk.
Note: These file names need to be 8 characters or less, and cannot use spaces within the name! Also, Microsoft Windows will not accept file names that include the characters (\, /,:, ?, ", <, >, |, or the space key.) If you use one of these characters in your file name, you will lose the file and the job that it is connected to. Good examples: high-end, low-end, stds1, stds2, etc.
- After you've finished typing in the desired name, move your mouse to click the Save button in the lower left part of the window. These standards are now saved.
Repeat this process with each set of standards that you want saved.
Shelves Standards
In this section you enter specifications regarding the shelves. Some of the information on shelves is also entered in the "Initial Values" standards window. The values you give for "dado depth" and for "width / depth-opening less" will be used to determine the size of the fixed and / or adjustable shelves you place in a cabinet. These values can be changed at any time and the changes will affect the shelves in the cabinets already placed.
Explanation of Shelf Specifications
BASES & UPPERS
- Base shelves include all cabinets that come into contact with the floor including full height pantries and full height double oven cabinets.
- Upper shelves include all of the cabinets that do not come into contact with the floor such as standard uppers, refer upper, hood upper cabinets, etc.
- Dado Depth: If you selected fixed shelves, enter the depth of the dado for the shelves. If the shelves are not dadoed, enter 0.
- Width - Opening Less: If you selected adjustable shelves, subtract the width of the shelves from the width of the opening. Enter the resulting number. (If you wish no space between the sides of the cabinet and the shelves, enter 0.)
- Depth - Opening Less (From Front): If you selected adjustable shelves, enter the distance from the front of the cabinet opening to the front of the shelf.
- Depth - Opening Less (From Back): If you selected adjustable shelves, enter the distance from the back of the cabinet opening to the back of the shelf.
- Add Structural Shelf Behind Center Rails?
- Add Structural Horizontal Partition Behind Edging?: In Face Frame, selecting the radio button labeled Yes will place a structural shelf behind all center rails in the cabinet. Selecting No will not place the structural shelf. In Euro, selecting the radio button labeled Yes will place a structural horizontal partition behind every horizontal edging in the cabinet. Selecting No will not place the structural horizontal partition.
- Position of Shelf Behind Center Rail: In Face Frame, you can position each structural shelf behind their center rails in the cabinet by choosing the appropriate radio button: Top, Center, or Bottom.
- Split Structural Shelves for Tray Dividers and Partitions Behind Mullions?
- Split Structural Horizontal Partitions for Tray Dividers and Vertical Partitions?: In Face Frame, you can split the structural shelves (if you opted to include them) when there are connecting tray dividers or vertical partitions by selecting Yes. In Euro, you can split the structural horizontal partitions behind edging (if you opted to include them) when there are connecting tray dividers or vertical partitions by selecting Yes. If you select No in either Face Frame or Euro, then the structural shelves or horizontal partitions will NOT be split and instead the tray dividers or partitions will remain as two individual boards. Note: A connecting tray divider or vertical partition is when the tray divider or partition in the opening above is directly above the tray divider or partition in the opening below and they join together to make one large tray divider or partition the length of both openings.
Shelves (Initial Values)
The number of shelves per opening, and whether those shelves are fixed or adjustable, is an initial value only. You will be able to change the number of shelves at the time each cabinet is placed. There are also instructions in Edit Elevations on how to change the number, and type of shelves in a cabinet after it has been placed. To get the best results, just enter typical values in these standards.
(Bases) Initial Number of Shelves Per Opening
- Fixed: Click on the selection if the base cabinet shelves are usually fastened permanently into a fixed position.
- Adjustable: Click on this selection if the base cabinet shelves are usually adjustable.
- Standard Base: Enter the typical number of shelves in a standard base cabinet.
- Full Height: Enter the typical number of shelves in a full height cabinet.
- Vanity: Enter the typical number of shelves in a standard vanity.
(Uppers) Initial Number of Shelves Per Opening
- Fixed: Click on the selection if the upper cabinet shelves are usually fastened permanently into a fixed position.
- Adjustable: Click on this selection if the upper cabinet shelves are usually adjustable.
- Upper: Enter the typical number of shelves in a standard upper cabinet.
Spreaders
If you are using Euro construction for your cabinets, the standards for stiles and rails are replaced with a standards window for spreaders. In Cabinet Solutions, spreaders are horizontal pieces that are placed between the top drawer of a base cabinet and the doors below or between drawers.
- Spreader Width (Depth): Enter the width of the spreaders in the entry field. The thickness is set in the "Material Thickness" standards box.
- Dado Spreader Into Ends: If you dado your spreaders into your end panels, enter the amount here.
Stiles
In this section you enter widths for different types of stiles. You can enter different widths for Left Stiles and Right Stiles in the entry fields provided. The thickness of the stiles is entered under material thickness (face frame) and the length of the stiles is automatically calculated for each cabinet.
Note: Stiles will be disabled in Euro.
Explanation of Each Stile Width
- Finished End Stile: Enter the width for all finished end stiles.
- Unfinished End Stile (Cab by Cab): Enter the width for the stiles of unfinished ends that are next to the unfinished end of another cabinet. Enter the width of each individual stile; not the combined width from both cabinets.
- Unfinished End Stile (by Wall): Enter the width for the stiles of unfinished ends that are next to a wall.
- Unfinished End Stile (by Appliance): Enter the width for the stiles of unfinished ends that are next to appliances.
- Extended End Stile (Base): Extended End may be a new term for some. Extended End Cabinets are the same thing as "Blind Corner Cabinets". Enter the width for the stiles of base extended ends that are next to base return ends.
- Extended End Stile (Upper): Enter the width for the stiles of upper extended ends that are next to upper return ends.
- Return End Stile (Base): Return Cabinets are simply the cabinet that is placed in the corner, adjacent to the Extended End. Enter the width for the stiles of base return ends that are next to base extended ends.
- Return End Stile (Upper): Return Cabinets are simply the cabinet that is placed in the corner, adjacent to the Extended End. Enter the width for the stiles of upper return ends that are next to upper extended ends.
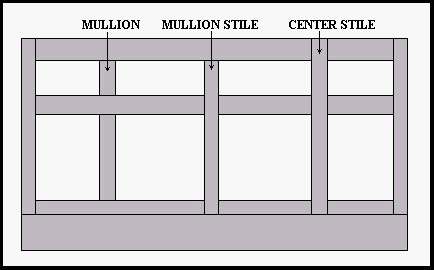
Cabinet Solutions distinguishes between mullions, center stiles and mullion stiles. The distinction we make is that mullions are vertical face frame pieces that attach between two rails. A center stile is a vertical face frame piece as well but it extends through the top and bottom rail. A mullion stile is a vertical face frame piece that acts like a mullion at the top (that is it attaches to the top rail without splitting it) and a center stile at the bottom (that is it will split through the bottom rail).
- Mullion Size: Enter the width of the mullions.
- Center Rail Size: Enter the width of the center rails.
- Mullion Stile Size: Enter the width of the mullion stiles.
Toe Kicks (Initial Values)
By default, base cabinets will be built with a back toe board. If you do not want a back toe board in your cabinets by default, then un-check the check box Include Back Toe Kick.
NOTE: You will not be able to restore back toe kicks to already placed cabinets once they are removed!
Toes + Sleepers
In this section you enter toe heights for standard cabinets and vanities. Your toe height can vary in height and depth of recess, you can even eliminate it and place your base face frame directly on the floor.
Explanation of Toe Specifications
Tray Dividers
The standards section for "Tray Dividers" is labeled Tray Dividers when you are building face frame cabinets and is labeled V. Partitions + Tray Dividers in Euro.
- Tray Dividers: Tray dividers are defined as any internal partition that does not sit behind a face frame piece or in Euro it is an internal cabinet divider that doesn't affect the cabinets door openings.
- Vertical Partitions: In Euro we will differentiate between tray dividers and vertical partitions. The difference is whether the vertical piece being placed affects the layout of the doors (in which case we call the piece a vertical divider) or the vertical piece may have no affect on the doors and just be a piece to divide the internal space (in which case we call it a tray divider).
In face frame construction, we will use a piece called a partition. It is a vertical piece that sits behind a face frame piece. They are a key part in making custom face frame cabinets (see Editing Cabinets).
Explanation of Tray Divider and Partition Specifications
- Dado into tops and bottoms of openings: If the tray dividers and partitions are dadoed into the top and bottoms of openings, click on this box until it is selected. Note: Tops and bottoms of openings can be a top or bottom of the cabinet or a structural shelf behind a center rail in Face Frame or a structural horizontal partition behind edging in Euro.
- Dado Depth: If the tray dividers and partitions are dadoed, enter the depth of the dado.
- Tray dividers depth less (front): Enter the distance from the front of the cabinet opening to the front of the tray divider.
- Tray dividers depth less (back): Enter the distance from the back of the cabinet opening to the back of the tray divider.
Using the Standards
This section contains an explanation of each of the standards and instructions for entering the standards. For many of the standards, you will find illustrations that will open up when you click into a particular category of the standards. This section assumes that you are already in either the job, or cabinet standards box. (Be sure you have picked the appropriate category for your particular application. For example, if you want to remove a back from a single cabinet, be sure to be in the cabinet standards box. If you are in the job standards box, you will eliminate backs in all bases and/or uppers.)
In the Standards Dialog Box, the standards are divided into two columns: General Setup and Cabinet Parts. Each column contains buttons with names for different types of standards. To see the standards, click on the button with the name of the standards you want to view. When entering your standards, you may enter measurements in inches (with fractions), inches (decimal), feet and inches, and metric (mm). Cabinet Solutions will automatically convert one type of measurement to another. To choose how the measurement is displayed click on Options in the menu bar.
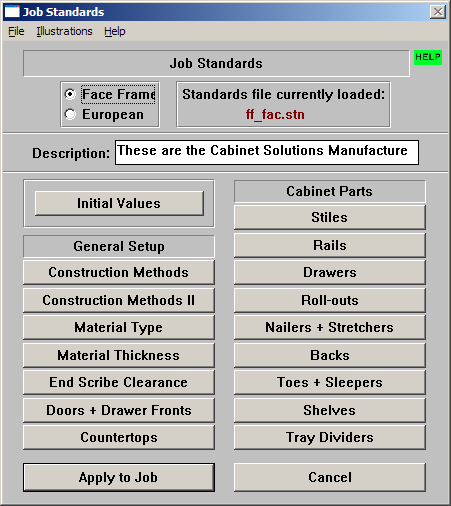
The Standards Window:
- Near the top of the window you'll find 2 radio buttons:
- Face Frame
- European (Frameless style construction)
- Selecting which style of construction you want to use is the first step in setting up your Standards.
- On the right of those 2 radio buttons, there is a line that tells you which of your standards file is currently loaded. If the file shown is not the one you'd like, follow the steps to open a new standards file or set the standards and save them as a new standards file
Note: Just because you click the Euro or Face Frame button does not mean the corresponding standards file is loaded. You may still need to follow the steps to load a specific standards file.
- Below the two radio buttons, there is an edit field where you can type in a description of the standards file. It will be saved with the standards file and shown to you when you open standards files. This is helpful for remembering what each standards configurations were built for.
Wainscot Standards
Explanation of Each Wainscot Standard:
- Frame Thickness: Enter the thickness of the door frame.
- Panel Thickness: Enter the thickness of the door panel.
The following 4 standards for left & right stile and top & bottom rail widths should be given finished sizes. If you cut these pieces oversize and then trim small amounts off when the panel groove is cut and the edge detail is put on, there will be other standards to use to enter that information so your cut-list is correct.
- Left Stile Width: Enter the finished width of the left stile.
- Right Stile Width: Enter the finished width of the right stile.
- Top Rail Width: Enter the finished width of the top rail.
- Bottom Rail Width: Enter the finished width of the bottom rail.
- Panel Size Less: Enter the amount you want to subtract off your panels to allow for expansion and contraction here.
- Groove Depth: Enter the depth you cut the groove in your stiles and rails to receive the panel here. You may refer to this cut as a "cope" depth.
- Amount Trimmed-Off with Groove: Enter the amount you will trim off your stiles rails when you run your groove for your panel.
- Amount Trimmed-Off with Edge Detail: Enter the amount you will trim off your stiles rails when you run your edge detail on your doors.
- Add Center Rail When Height >: Doors panels will often bow if they get too large in size. To help eliminate this problem, many shops want to add a center rail into the door if the door exceeds a certain size. Enter the size of door that when exceeded you want the program to automatically place a center rail.
- Center Rail Width: Enter the width you want the center rails to be when the program adds them here.
- Wainscot Center Rail Width: Enter the width you want the center rails (horizontal face frame piece) to be.
- Wainscot Mullion Width: Enter the width you want the mullions (vertical frame piece) to be.
- Wainscot Rail / Mullion Thickness: Enter the thickness of the Wainscot parts.